




Academy LMS 4.0 IS LIVE

00
Days
:
00
Hours
:
00
Minute
:
00
Second

Manual Enrollment

Academy LMS lets you put a student on a course yourself, take them off again, give every enrollment a shelf life, and hand one student extra time. This guide covers all four.

Note: These are Pro features, and they sit behind two separate switches. Enrolling and cancelling need the Manual Enrolment add-on. Expiry and extension need the Expire Enrollment setting. Turning one on does not turn on the other.

Before you start

Academy LMS and Academy LMS Pro are both active.
You are logged in as an administrator. Every enrollment action needs the manage_options capability.
You have at least one published course and one student account.

Step 1: Turn on the Manual Enrolment add-on

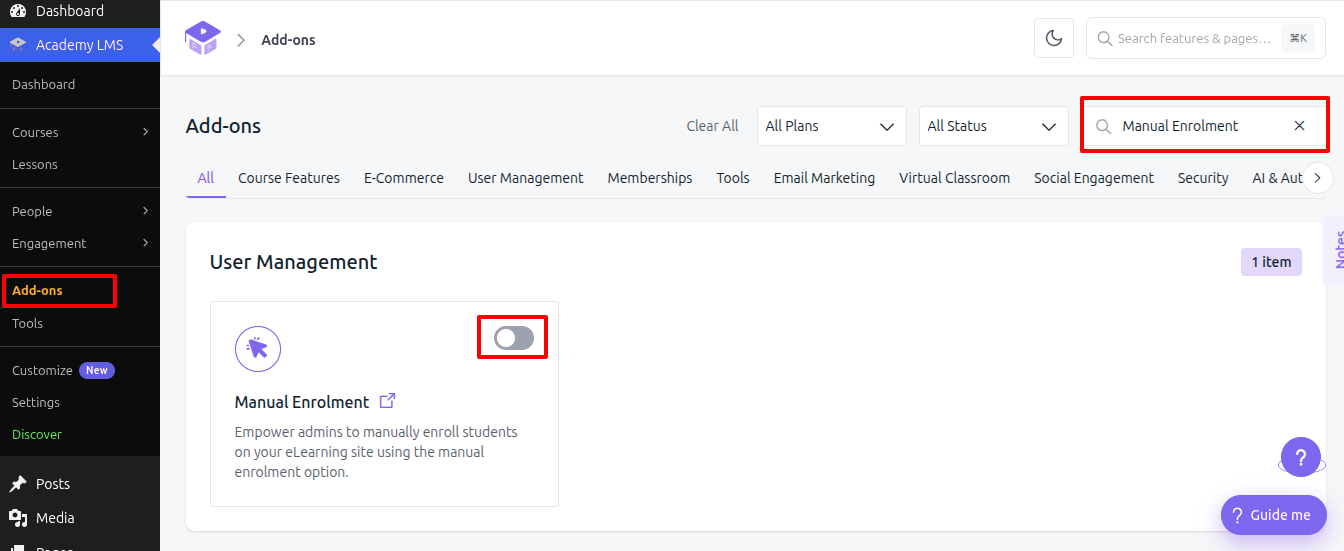
Go to Academy LMS → Add-ons and search for Manual Enrolment. The add-on sits under User Management. Switch the toggle on.

Until you do this, the Enroll Student button does not appear on the Students screen at all.

Turn on the Manual Enrolment add-on

Step 2: Open the Students screen

Go to Academy LMS → Students. Two buttons sit at the top right:

1.Add Student creates a new user account. It does not enroll anyone.
2.Enroll Student puts existing students on courses. This one only appears once the add-on from Step 1 is on.
Open the Students screen

Step 3: Enroll a student

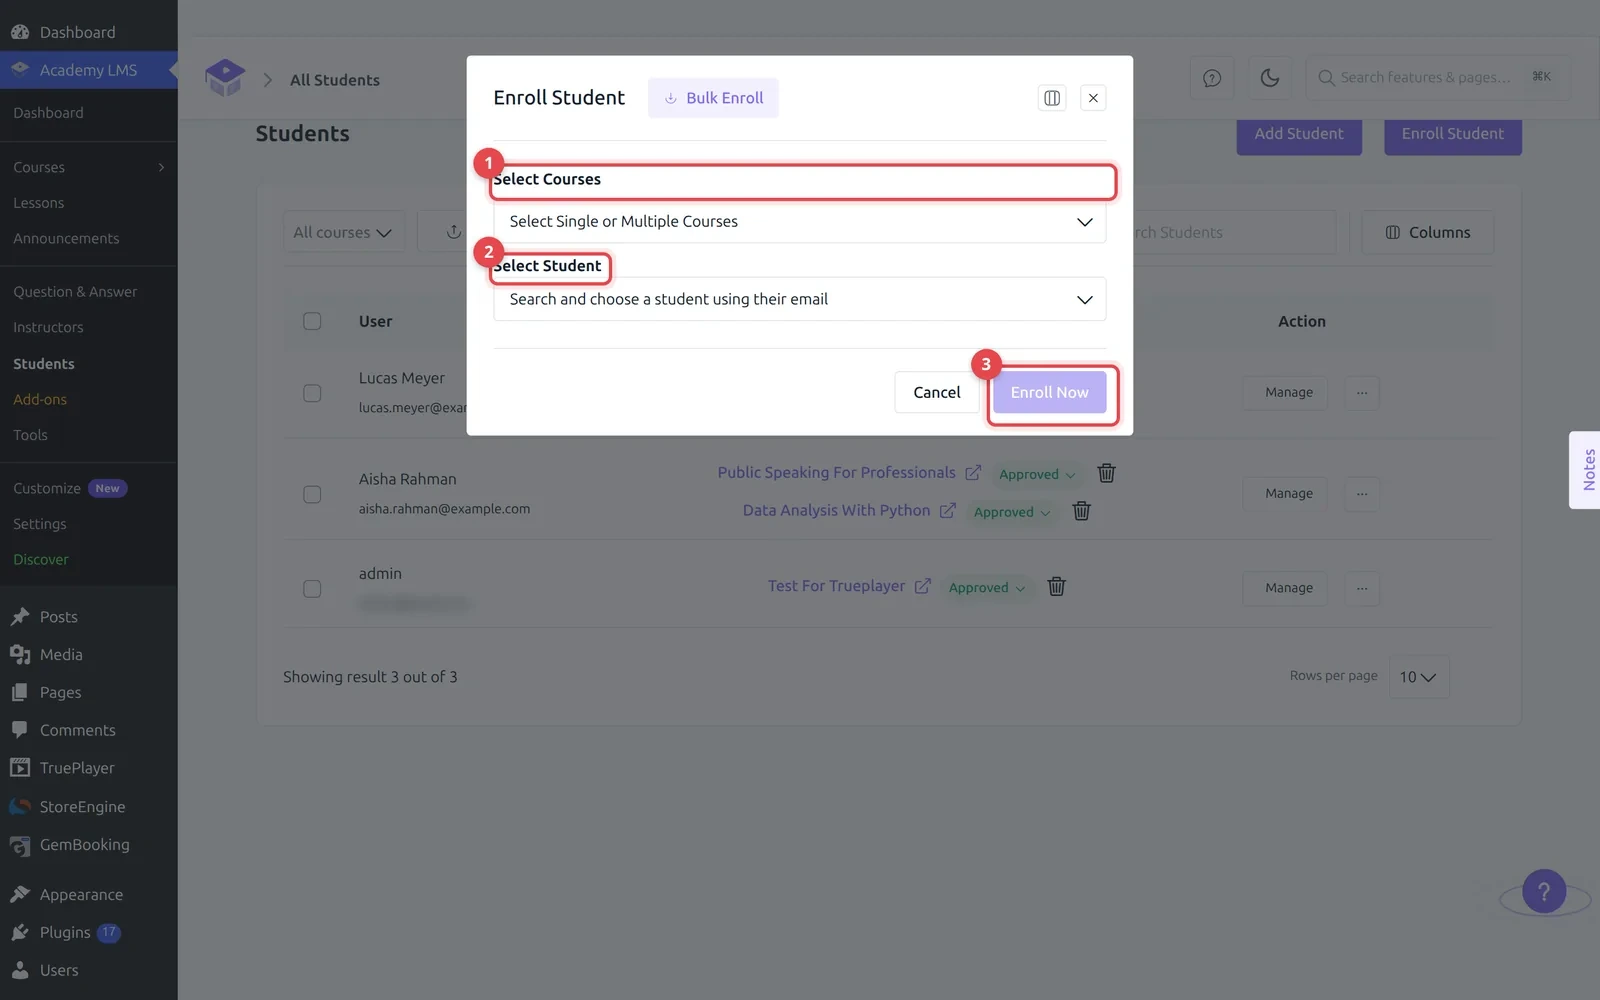
Click Enroll Student and fill the two fields:

1.Select Courses: pick one course or several. The field searches as you type.
2.Select Student: search for the student by email. The list shows the display name, the user ID and the email together, so you can tell two similar accounts apart.
3.Click Enroll Now.

You can pick several courses and several students in one go, and Academy enrolls every student in every course you chose. After it runs, the modal lists one line per student so you can see exactly what happened. A student who was already fully enrolled comes back as Already Enrolled! instead of being enrolled twice.

Enroll a student

Step 4: Enroll many students from a CSV

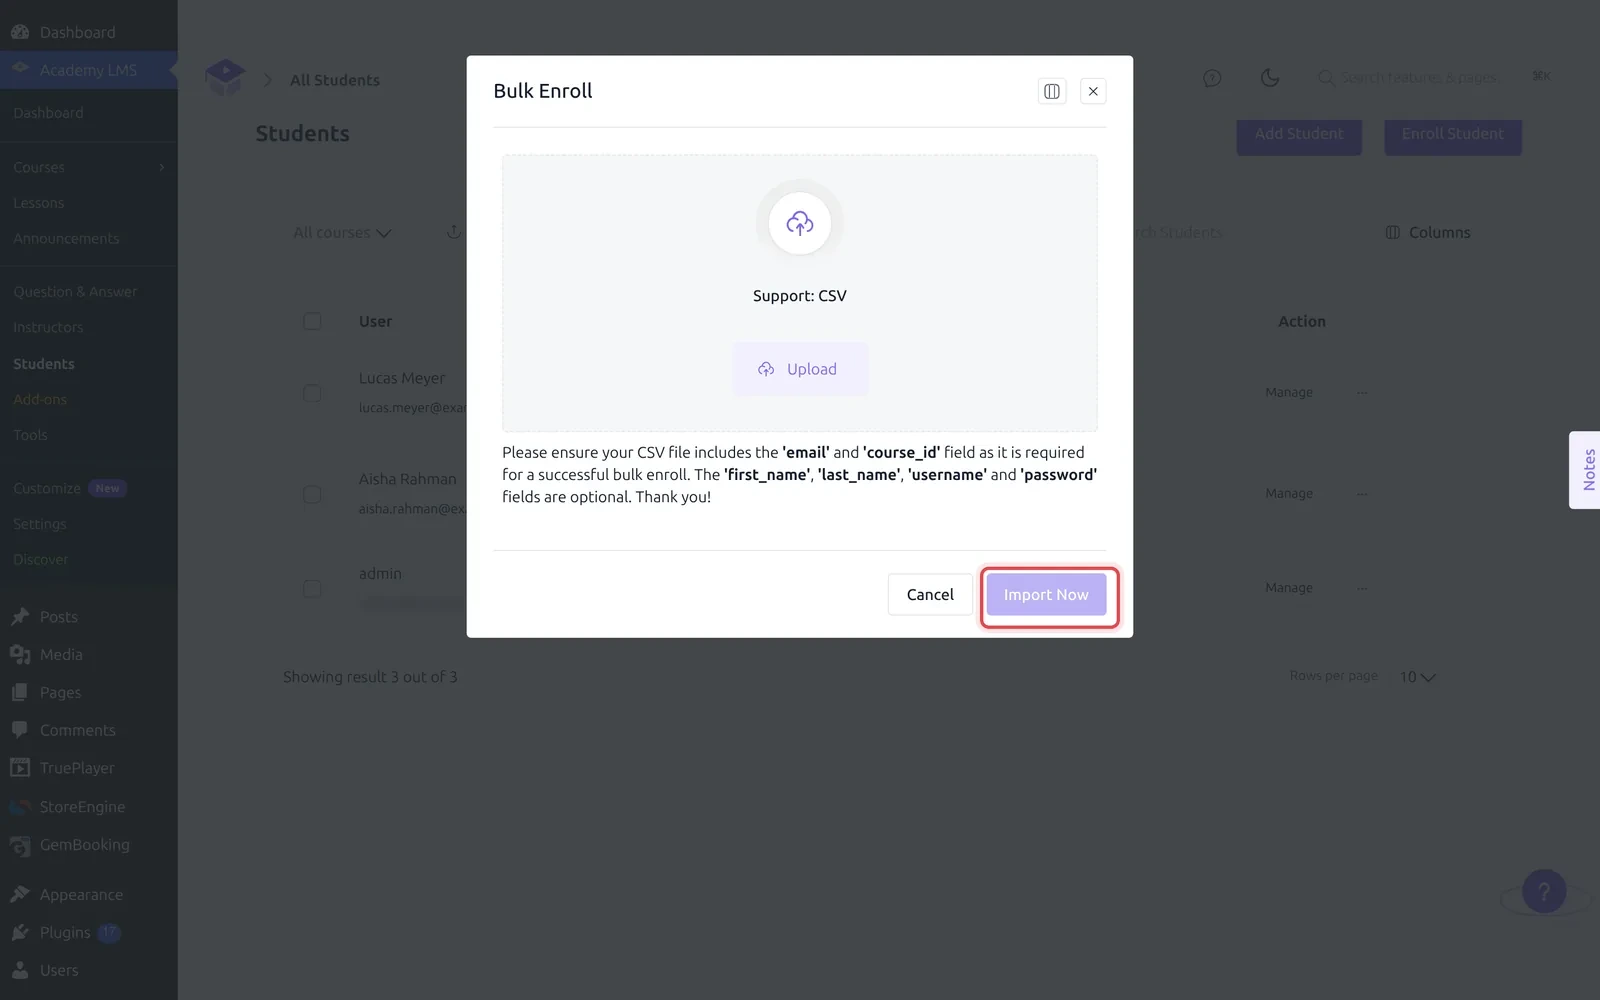
For a whole intake, click Bulk Enroll at the top of the Enroll Student dialog and upload a CSV.

Column

Required

email

yes

course_id

yes

first_name

no

last_name

no

username

no

password

no

Rows for people who do not have an account yet will create one. Click Import Now to run it, and the results appear under Imported Data List.

To find a course_id, open the course in the admin list and read the id in the address bar, or hover the course title.

Bulk Enroll

Step 5: See what a student is enrolled in

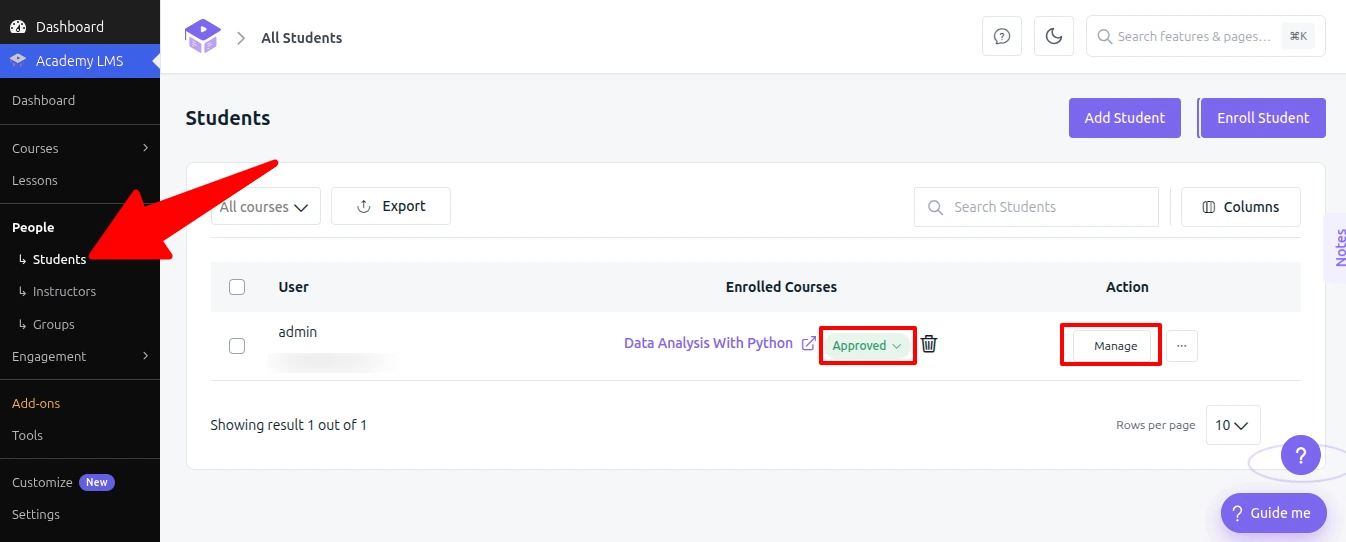
The Enrolled Courses column (1) lists every course the student holds. Next to each one is a status you can change (Pending or Approved) and a bin icon that cancels that single enrollment.

For everything else, click Manage (2).

See what a student is enrolled in

Step 6: Cancel an enrollment

You have two ways to do it:

Click the bin icon beside the course in the Enrolled Courses column.
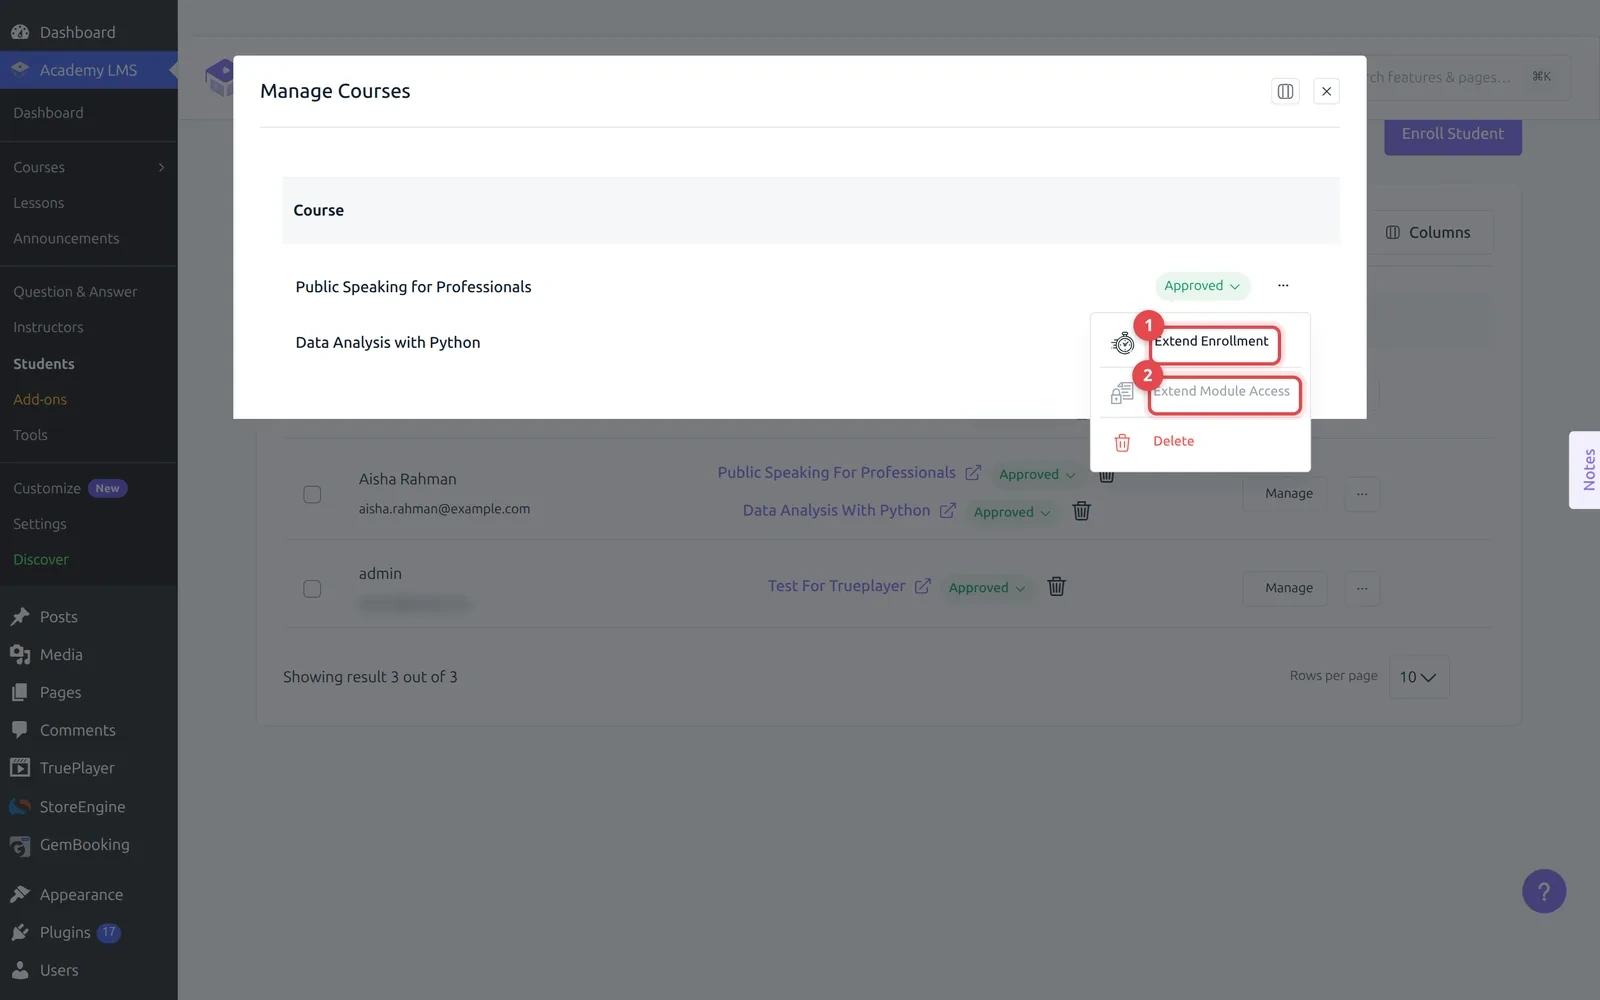
Click Manage, then open the action menu beside the course and choose Delete.

Either way Academy asks “Are you sure to cancel enrollment?” before anything happens. Cancelling removes the student’s access to that course. It does not delete their account, and it does not touch their other courses.

The Delete entry only exists while the Manual Enrolment add-on is on.

Manage Courses

Step 7: Turn on enrollment expiry

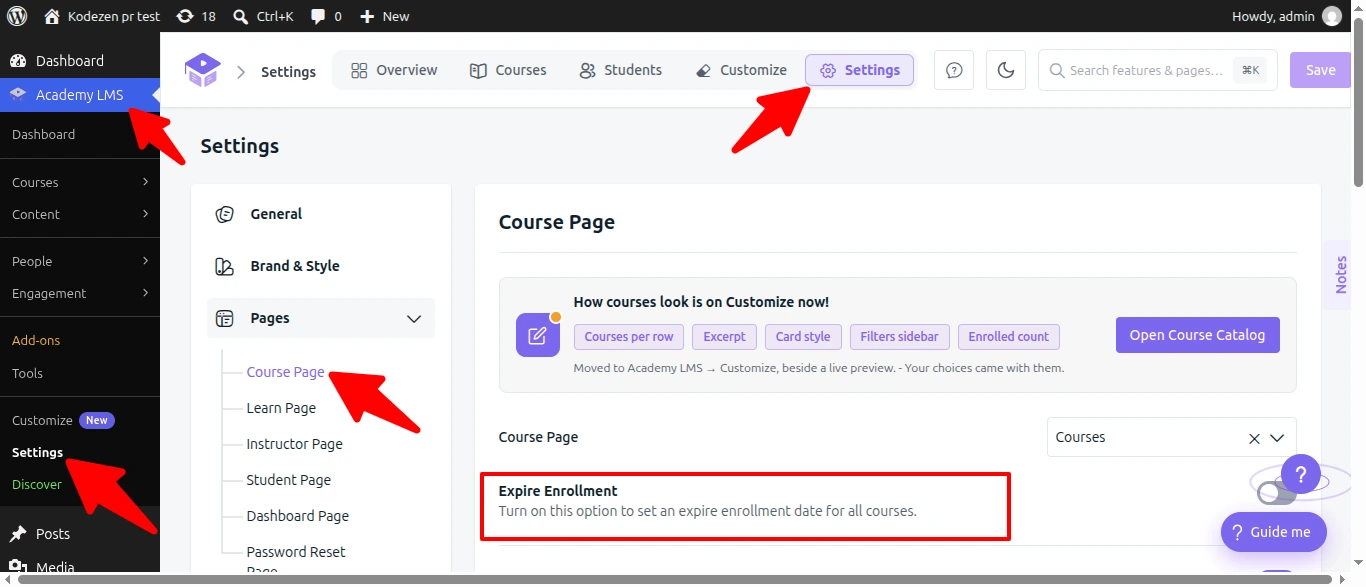
By default every enrollment lasts forever. To change that, go to Academy LMS → Settings → Pages → Course Page and turn on Expire Enrollment, then click Save.

This switch is off on a fresh install, and it controls the whole feature. While it is off, the per course field in Step 8 is hidden and Extend Enrollment in Step 9 is greyed out.

Turn on enrollment expiry

Step 8: Set how long access lasts on a course

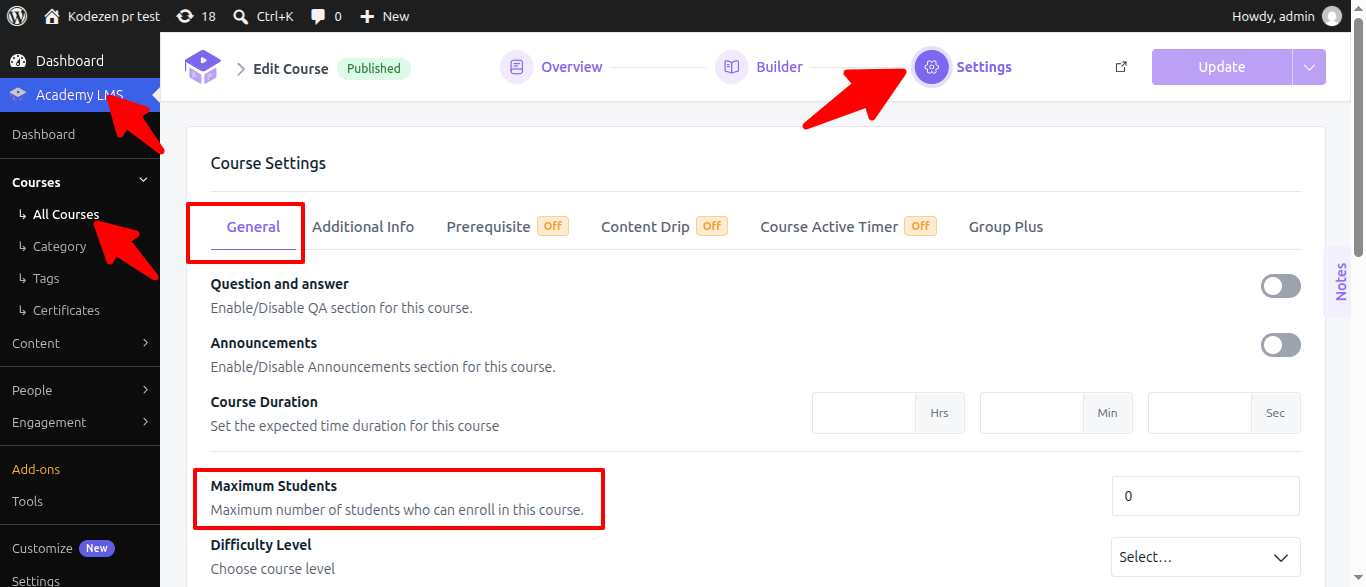
Expiry is set per course, in days. Open the course, go to Settings → General, and fill Expire Enrollment.

The number is counted from the day each student enrolls, not from a fixed calendar date, so every student gets the same length of access whenever they join. Leave it at 0 for lifetime access.

Set how long access lasts on a course

Step 9: Give one student more time

To extend a single student without changing the course, click Manage on their row, open the action menu beside the course, and choose Extend Enrollment.

1.Enrollment Duration shows what this student currently gets, course setting plus any extension already granted. It reads No expiry set when the course has none.
2.Extend Duration is the extra time, a number plus Day, Week or Month. A month counts as 30 days.
3.Click Save Changes.

Status above is shown for reference only and cannot be edited here. Change it from the status control in the Enrolled Courses column instead.

One thing to know: Extend Duration sets the extension, it does not add to a previous one. If you extend a student by 1 week and later extend the same course by 1 week again, the extension stays at 7 days. To give 2 weeks in total, enter 2 weeks.

Extend Enrollment Duration

How expiry actually works

Access is checked when the student next tries to use the course. At that moment Academy compares the enrollment date against the course’s expiry plus any extension for that student, and if the window has passed it cancels the enrollment.

There is no nightly job for this. An enrollment that has run out stays on the books until something looks at it, so a report can still count a student as enrolled after their access has lapsed. Opening the course as that student settles it.

Extending a student who has already lapsed restores their access, as long as the new total window covers today.

Troubleshooting

The Enroll Student button is missing. The Manual Enrolment add-on is off, or Pro is not active. See Step 1.

Extend Enrollment is greyed out. The Expire Enrollment setting is off. Turn it on in Settings → Pages → Course Page, as in Step 7.

Extend Module Access is greyed out. That is a different feature and needs the Content Drip add-on, on a course set to release content by module.

A student still has access after the expiry date. The check runs on access, not on a schedule. Have the student open the course, or open it as them, and the enrollment will be cancelled then.

Bulk enroll skipped some rows. Every row needs both email and course_id. Check the course_id values match real courses.