








Changing a learning management system affects more than your course pages. Students still need access to their lessons, quizzes need to work, and your team needs confidence that important records made the move.
A careful plan makes the switch easier to test and easier to explain to learners.
This guide shows how to move from a supported WordPress LMS plugin to Academy LMS. It covers preparation, Academy LMS setup, the Migration Tool, and the checks to complete before launch.
What is an LMS migration?
An LMS migration moves learning content and related records from one system to another. For a WordPress course site, that can include courses, lessons, quizzes, questions, enrollments, orders, and completion records.
Exactly what transfers depends on the source plugin and the data it stores.
The Academy LMS Migration Tool supports LearnPress, LearnDash, Tutor LMS, LifterLMS, and Masterstudy LMS.
It is designed for moving from those WordPress plugins into Academy LMS. If your courses are on a hosted platform outside WordPress, you will need to check a different export and import route.
Why move to Academy LMS?
You may want a different course-building workflow, student experience, or way to manage your WordPress learning site. Before deciding, write down what the current LMS makes difficult and what the replacement must do better. Include the needs of instructors, students, and anyone who handles sales or support.
The migration itself is only part of that decision. You should also check whether your payment, membership, email, certificate, and reporting workflows will work in the new setup. A feature you rely on today may need its own add-on or a new configuration after the move.
What data should you check before starting?
Make a simple inventory of your current site:
The official Migration Tool feature list shows that supported data types vary by source. For example, it lists assignments and content drip settings for Tutor LMS, while the lists for other source plugins differ.
Use the inventory to decide what must be checked manually after migration. Do not assume that every setting or every point of learner progress will transfer in the same way.
Step 1: Back up the site and prepare a staging copy
Create a full backup of your WordPress database and files. Check that you can restore it. Then make a staging copy of the site and run the first migration there. Academy LMS recommends a trial on staging so you can find problems before students encounter them.
Note what changes on the live site while you test. New enrollments, orders, and lesson activity can make the staging copy outdated, so plan how you will handle those records at launch.
Step 2: Install and configure Academy LMS
On the staging site, go to Plugins → Add New Plugin, search for Academy LMS by Kodezen, then select Install Now and Activate. The Academy LMS menu should appear in the WordPress dashboard. The installation guide covers these steps. Keep your existing LMS plugin active for the migration.
Next, run the Academy LMS Setup Wizard:
1. Choose your business type: Select Individual for one instructor or Marketplace for multiple instructors. The Marketplace choice enables the Multi Instructor add-on.
2. Set the student dashboard and login: Choose the Dashboard page and decide whether to use the Academy login form.
3. Set registration and access: Choose instructor and student registration pages, then review the publishing and file-upload permissions.
4. Choose a payment setup: Free courses do not need a payment plugin for normal use. If you sell courses, configure your chosen payment workflow and test checkout.
The page setup guide says Academy LMS normally creates Courses, Dashboard, Instructor Registration, Password Reset, and Student Registration pages. Check Pages and connect any missing or unassigned pages under Academy LMS → Settings → Pages. Also check Settings → Permalinks; the guide recommends using a structure other than Plain.
Migration requirement: The Migration Tool documentation says Academy LMS, the source LMS plugin, and WooCommerce must be installed and active before running migration. Check these requirements even if you plan a different long-term payment setup.
Step 3: Enable the Migration Tool
Open Academy LMS → Add-ons and enable Migration Tool. Select its settings icon, or go to Academy LMS → Tools → Migration. The add-on instructions explain how add-ons are enabled from the dashboard.
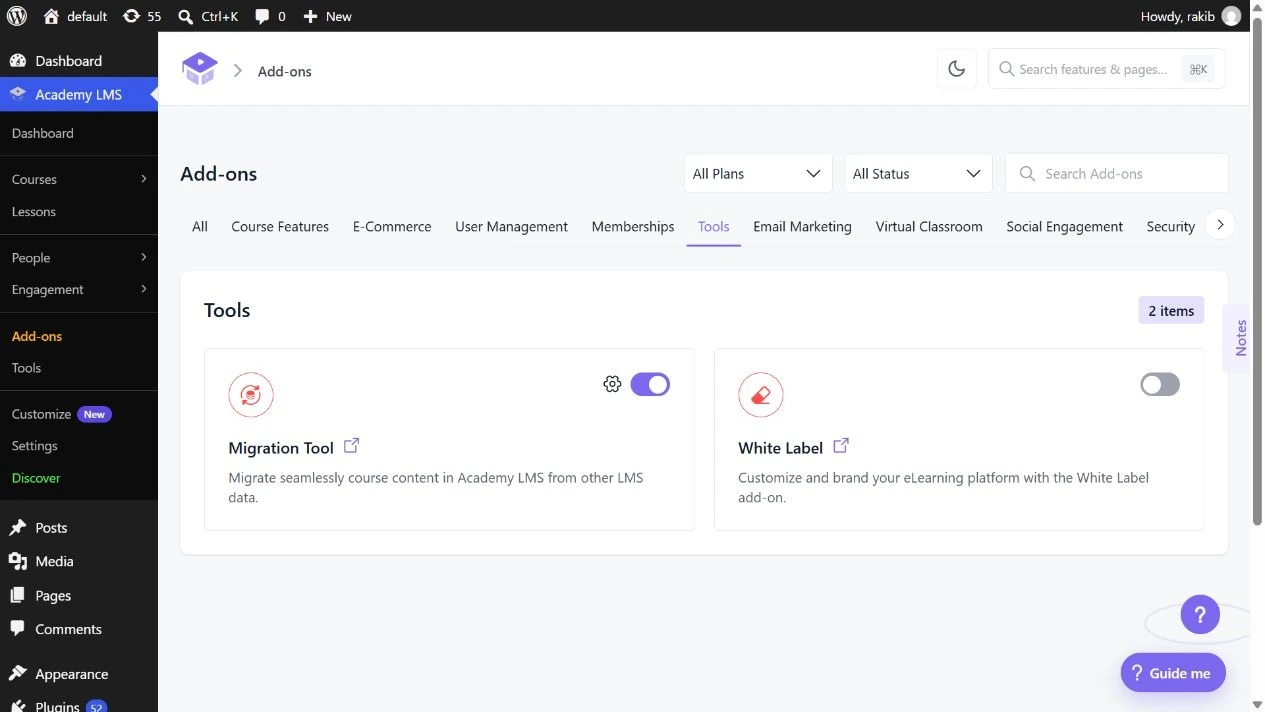
The Migration Tool is enabled in Academy LMS Add-ons.
Step 4: Select the source LMS and run a test migration
On the Migration screen, choose the LMS you are moving from. Read the data types displayed for that source before selecting Run Migration. The items shown are different for each plugin, as the migration instructions note. Run this first on the staging copy.
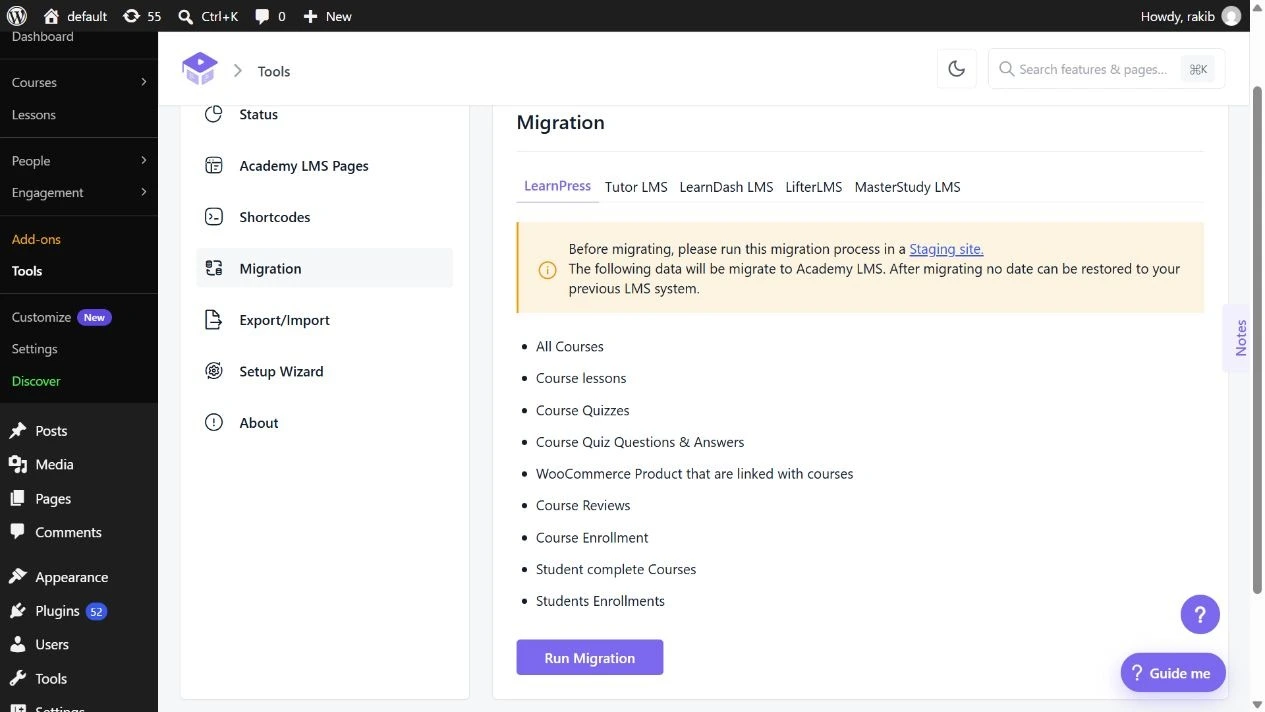
Choose the source LMS and review the listed items. LearnPress is selected in this example; select your own source before running migration.
Step 5: Verify the migrated site
Compare the result with the inventory you made earlier. Do more than check whether the course count looks right:
Academy LMS warns that some course or lesson descriptions may look broken after migration. Its documentation recommends editing affected descriptions in the WordPress block editor and using Convert to Blocks when needed.
Step 6: Reconnect integrations and launch
Review payments, memberships, email notifications, certificates, and other tools your site uses. Test each workflow on staging. Before the live cutover, make a fresh backup and account for activity recorded since the staging copy was made. After migrating the live site, repeat the most important checks and tell students where to log in and how to get help.
Final migration checklist
The best migration is one you can verify. Academy LMS provides the transfer tool; your staging test, data checks, and launch plan make the new learning site ready for real students.
Final Thoughts
Migrating your courses to Academy LMS doesn’t have to be complicated, but it should be handled carefully.
The Migration Tool can help transfer supported learning data from compatible WordPress LMS plugins, while a staging environment gives you a safe place to identify and fix problems before students are affected.
The most important part of the process is verification. Compare your migrated content with your original LMS, test student workflows, check integrations, and create a clear plan for the final live migration.
With proper preparation and testing, you can move your WordPress courses to Academy LMS with greater confidence and provide your students with a smooth transition.
Frequently Asked Questions
1. What data can be migrated to Academy LMS?
The available data depends on the source LMS plugin. It can include courses, lessons, quizzes, questions, enrollments, orders, and other supported records. The supported data types are different for each source plugin.
2. Do I need a staging site for Academy LMS migration?
A staging site is recommended for the first migration. It allows you to test the migration and identify problems before students use the new LMS.
3. Can I migrate courses from a hosted LMS platform to Academy LMS?
The Migration Tool described in this guide is designed for supported WordPress LMS plugins. If your courses are hosted on a platform outside WordPress, you need to check a different export and import route.
4. Should I back up my WordPress site before migration?
Yes. Create a full backup of your WordPress database and files and make sure you can restore it. Academy LMS also recommends testing the migration on a staging site before making changes to the live site.